Installing Windows Server 2008 on a Compaq ProLiant ML310 G1 server

I have an old first-generation (G1) Compaq ML310 server that I use as a multi-server on my home network. Since it is so old the server is only capable of running an x86 OS, but it has 3 GB of memory so I manages the job for my small network. It is certified for Windows Server 2003 and has been happily running that OS for a couple of years now. This weekend I decided it was time to upgrade it to Windows Server 2008.

052508_0005_InstallingW1

Figure 1: The Compaq ML310 G1 Server

First I installed a virtual Windows Server 2008 machine on my desktop computer. I updated the schema for Windows Server 2008 (from my old server, since adprep.exe /forestprep must run on a DC). Then I moved all the services the old server was running, DNS, DHCP, Certificate Authority etc, to the new virtual machine. Finally I installed Exchange 2007 and moved all the mailboxes to the virtual server. Then it was time to decommission the ML310’s workloads and I uninstalled Exchange 2007 and demoted it to a member server. After verifying that no data that I required was left on the old server I popped in the Windows Server 2008 DVD and rebooted. That was when the fun started.

My first snag was to discover that the ML310 does not have a DVD-ROM drive, but a CD-ROM drive. No biggie, I found an old DVD-ROM drive in a closet and installed it. When that was in place I could boot the Windows Server 2008 DVD.

The ML310 has an onboard LSI IDE ATA-100 RAID Controller. The RAID system is pretty simple and you have to create the arrays from the controller BIOS while the OS is down. I have 4 drives in the server, distributed over two RAID 1 arrays. To make windows see the arrays I have to load a driver during OS setup. On Windows Server 2003 this was done pressing F6 at the beginning of setup and popping in a floppy with the required driver. I had been using the driver from the HP website up until I decided to upgrade. The main file of the driver is MegaIDE.sys and the HP driver is version 2.5.2003.613. I figured I would try that driver first and see if I could make it work with Windows Server 2008 and the RAID 1 arrays.

After you have selected which Windows Server 2008 edition you want to install the setup process brings up a listing of available drives in your machine. My list contained 6 items; 4 partitions and 2 unallocated free space, divided over 4 physical disks. This meant that the default Windows driver was not RAID capable. I proceeded to hit the Load Driver button and load the HP driver from floppy. That did not work at all. It found the driver but setup never continued. I figured it might be a bad floppy so I copied the driver files to a USB key instead and tried again. This time the driver loaded successfully but setup still displayed the same 6 items, so that driver was not RAID capable when used with Windows Server 2008 either. What to do?

The HP driver is pretty old so I decided to see if LSI, the manufacturer of the RAID controller, had a newer version. I found one on their website. In this driver package the MegaIDE.sys driver was version 4.1.0709.2003, a definite improvement. Just to be sure I verified that the Plug and Play ID of my controller (PCIVEN_1095&DEV_0649&SUBSYS_007E0E11) was present in the INF file for the new driver. Since it was, I copied it to the USB drive and loaded it in Windows setup.

Success! After the driver loaded, the number of items was down to 3, now showing 2 physical drives (really the two logical RAID 1 drivers) and 2 partitions (one on each drive), plus the unallocated space. Things were looking good. I wanted to do a completely clean install so I decided to delete the old partition on the first physical drive and have setup recreate it. That produced an error, but I was not too deterred by this. I rebooted the server and went into the controller BIOS and re-initialized the array, figuring that it had somehow been corrupted or altered by me messing about with the old driver. Back in setup with the new driver loaded I now had only unallocated space on my drive. I hit Next and Windows Setup proceeded to try and create a new partition in this free space. That produced another error.

Windows could not create a partition. Error 0x80070013.

The 0x in front of the error tells us that this is a hex number and we need to translate it into decimal in order to find out what it means. 13 hex is 19 decimal. Using this command we can get the clear text data from the error:

PS C:WindowsSystem32> net helpmsg 19

The media is write protected.

So I knew what the problem was, just not how to fix it. I rebooted again and went back into the controller BIOS. I deleted the array and recreated and re-initialized it. Booted the DVD once more, loaded the LSI RAID driver. The newly recreated array came up as free space and I selected it and hit next. This time I got no error and Windows Server 2008 started installing.

I still think my theory about the original array becoming corrupted or having been modified in some way to be correct. I did a lot of stuff to the partitions while trying to make the old HP driver work. Circumstantial evidence to back up this conclusion is that the other array is accessible in Windows Server 2008 without problem.

Windows Server 2008 installed successfully and I started configuring the server. I quickly noticed that the server had no network connectivity due to a missing NIC driver. That was, however, the only unknown device. The ML310 uses an HP NC7760 Gigabit Server Adapter, whose driver is not included on the Windows Server 2008 DVD. I downloaded the Windows Server 2003 driver from HP and it installed without problem. All network service ran perfectly. The NIC driver is quite old. Its version is 8.52 and the date 12.01.2006. I decided to look for a newer version. A quick Google search of the hardware IDs of the NC7760 adapter revealed that it is in reality a Broadcom NetXtreme Gigabit Ethernet adapter. I went to Broadcom’s site and downloaded the latest driver. Windows Server 2008 would not upgrade to that driver, since the INF file from Broadcom did not have an exact match for the most specific Hardware ID, like the HP INF file did. Instead of trying to edit the Broadcom INF file and add the NC7760 Hardware IDs I just uninstalled the driver and selected to delete the driver files in the process. Then I could do a search for new hardware and install the Broadcom driver. The new driver is from 17.09.2007 and is version 10.62.0.0, quite an improvement as well.

As an encore I tried to install the RAID management software from LSI. It installed successfully and the Spy program, which sits in the system tray and monitors drive health, worked well. Not so for the MMC snap-in that manages the arrays themselves. It always gives an error and then freezes when I try to start it. Can’t win ’em all I guess.

I finished the server upgrade by promoting it to a DC, adding all the roles (CA, DHCP, etc) and installed Exchange 2007 with SP1. My only regrets are that the computer is not x64 compatible which means that I can’t run a supported version of Exchange 2007, and that I can’t run Hyper-V.

For those who are interested here are the links to the software I have mentioned in this post:

DCPROMO install problem

Trying to install a new child domain in an existing forest I received this error from DCPROMO:
—————————
Active Directory Installation Wizard
—————————
The wizard cannot gain access to the list of domains in the forest.
This condition may be caused by a DNS lookup problem. For information about troubleshooting common DNS lookup problems, please see the following Microsoft Web site: http://go.microsoft.com/fwlink/?LinkId=5171
The error is:
The RPC server is unavailable.
A trace of the network traffic during the dcpromo process revealed a connection attempt from the local computer to one of the DCs in the root domain using the computername and username of the local computer. This of course fails since the local computer is to become the first domain controller in the new child domain and thus is in a workgroup. I could not see exactly what the local server was trying to connect to, so I started authenticating to the most common ones: IPC$, C$ and ADMIN$. Turns out it was ADMIN$ and after I ran this command, I was able to continue the dcpromo process:
net use \<name of DC in root domain>admin$ /user:<root domain><administrator in root domain>
Just as dcpromo was starting (after the summary screen) I received another error:
Managing the network session with \<name of DC in root domain> failed
“Multiple connections to a server or shared resource by the same user, using more than one user name, are not allowed. Disconnect all previous connections to the server or shared resource and try again.”
Dcpromo failed after this.
I restarted dcpromo and ran it all the way up to the summary screen. Before I hit Finish I ran this command to delete all connections to remote servers:
net use * /delete
Dcpromo could now successfully complete.
The Dcpromo log was also valuable in troubleshooting this, it can be found in %systemroot%debug.

How to remove the VMWare tray icon for all users

Find this key:
HKEY_LOCAL_MACHINESOFTWAREVMware, Inc.VMware Tools
or, if you’re on x64:
HKEY_LOCAL_MACHINESOFTWAREWow6432NodeVMware, Inc.VMware Tools
Change the ShowTray DWORD value to 0.
Since this is in the HKLM hive it will take precedence over the same setting under HKCU.
If you want to disable the icon only for the logged on user, change the same value but now under HKCU.

How to install Windows Live programs on an unsupported OS

For some reason Microsoft has decided to not let us install any of the Windows Live programs; Messenger, Gallery etc. on Windows Servers or x64 editions of Windows XP. If you try to run the installer (WLInstaller.exe) on any of these OSs you see this error:
—————————
Windows Live Installer
—————————
Sorry, Windows Live programs cannot be installed on Windows Server, Windows XP Professional x64 Edition, or Windows operating systems earlier than Windows XP Service Pack 2.
—————————
OK
—————————
This is quite a problem for Terminal Server users.
To work around this do the following:
  1. Download and run the WLInstaller.exe on a supported OS.
  2. Select the programs you want and let the installer finish.
  3. Navigate to C:Program FilesCommon FilesWindowsLiveInstallerMsiSources or C:Program Files (x86)Common FilesWindowsLiveInstallerMsiSources if you are on x64 Vista.
  4. Copy the MSI files for the programs you need to the unsupported OS and install them. You will have to guess as to which MSI file is for which program, but that is doable.

The installation on the unsupported OS is completely automated, you will not be asked for any input.

Nice work Microsoft…

Working with Group Policy Restricted Groups policies

What are Restricted Groups?

The Restricted Groups security setting in Group Policy allows an administrator to define two properties for security-sensitive groups (“restricted” groups). The two properties are Members and Member Of. In short it lets an Administrator decide which security principals are members of a restricted group, and which groups the restricted group is a member of. The Restricted Groups security setting can be found under Computer Configuration\Windows Settings\Security Settings\Restricted Groups in any Domain based GPO. The Members section enforces the membership of a group. Any existing members of the restricted group are removed and only the security principals listed in the Members section are members of the restricted group. Conversely, the Member Of section simply ensures that the restricted group is added to the groups listed in Member Of. It does not remove the group from other groups of which it is a member. This means that if you use the Members section; only the security principals you select will be members of a restricted group, all existing members of the group will be removed. If you use the Member Ofsection your group is only added to the restricted group.

Let’s say you want to add the domain group Domain Users to the local Administrators group on a set of computers. With Restricted Groups there are two approaches; using the Members section or using the Member Ofsection. In the first case, the restricted group is Administrators, and we add Domain Users as a member.

052508_2246_Workingwith1

Figure 1: Using the Members section of Restricted Groups

When using the Memberssection like this, all existing members of the Administrators group will be removed for all computers where this policy is applied.

In the second case the Restricted Group is Domain Users, and we specify that it should be a member of Administrators.

052508_2246_Workingwith2

Figure 2: Using the Member Of section of restricted Groups

When using the Member Ofsection like this, the existing membership of the Administrators group is preserved and Domain Users is simply added on all computers where this policy is applied.

In either case your policy should be linked to an OU where the computers on which you want the policy applied are located.

GptTmpl.inf

The Restricted Groups information, along with every other setting under the Security Settings container in a GPO, is stored in an INF file called GptTmpl.inf. Each GPO with security settings has one GptTmpl.inf file and its path is always:

%systemroot%\SYSVOL\sysvol\<DNS domain name>\Policies\<GUID of GPO>\Machine\Microsoft\Windows NT\SecEdit\GptTmpl.inf

The section where the Restricted Groups info is stored is called Group Membership.

[Unicode]
Unicode=yes
[Version]
signature=”$CHICAGO$”
Revision=1
[Group Membership]
*S-1-5-21-12345678-123456789-123456789-513__Memberof = *S-1-5-32-544
*S-1-5-21-12345678-123456789-123456789-513__Members =
*S-1-5-32-544__Memberof =
*S-1-5-32-544__Members = *S-1-5-21-12345678-123456789-123456789-513

Figure 3: Example GptTmpl.inf file

Notice that all the groups we selected in the interface have been resolved to SIDs and that those SIDs are prepended with an asterisk (*) character. This is important as we will see later.

Group Names and SIDs in Restricted Groups (to resolve, or not to resolve)

The problem with the Restricted Groups interface is that it allows you to either browse for a group name or enter one manually. It is very important to understand what happens in each case. If you browse; the SID of the group you selected will end up in the INF file in the policy. If you enter a name manually; the name ends up in the INF file.

[Unicode]
Unicode=yes
[Version]
signature=”$CHICAGO$”
Revision=1
[Group Membership]
*S-1-5-21-12345678-123456789-123456789-513__Memberof = Another Example Group,*S-1-5-32-544
*S-1-5-21-12345678-123456789-123456789-513__Members =
Manually Entered Group Name__Memberof =
Manually Entered Group Name__Members = *S-1-5-21-12345678-123456789-123456789-513,Another Example Group

Figure 4: Example GptTmpl.inf file demonstrating the difference between entering names manually and browsing

I this example GptTmpl.inf file we see this difference clearly. The group *S-1-5-21-12345678-123456789-123456789-513 (Domain Users) is resolved and has therefore been browsed for. Of its members one, Another Example Group, has been entered manually and the other, *S-1-5-32-544, has been browsed for. The group Manually Entered Group Name has been manually entered and of its members, one has been browsed for, *S-1-5-21-12345678-123456789-123456789-513, and the other, Another Example Group, has been manually entered.

Manually entered names, of either groups or users, are only valid if the computer applying the policy can resolve them. If you want to control the membership of the local Administrators group on computers and enter the name Administrators manually into the Restricted Groups interface; your policy will only work on computers where the local Administrators group is named exactly Administrators (not case-sensitive). Meaning that if the computer applying the policy is running a localized version of Windows, the policy will fail, because the Administrators group is not named Administrators, but has had its name translated into whatever language is running on the computer. In this scenario it is better to use well-known SIDs in Restricted Groups to guarantee that the policy works on all versions of Windows.

What are well-known SIDs and how to make sure you use them correctly in Restricted Groups?

A security identifier (SID) is a unique value of variable length that is used to identify a security principal or security group in Windows operating systems. Well-known SIDs are a group of SIDs that identify generic users or generic groups. Their values remain constant across all operating systems. A list of all well-known SIDs is available here:

Well-known security identifiers in Windows operating systems
http://support.microsoft.com/kb/243330

If you want to use a well-known SID in a Restricted Groups policy you must edit the policy on a machine that has access to that group and use the browse button to select it. As we have seen, browsing for a group guarantees that it is resolved to its actual SID, but to be able to browse for a group we must be on a machine that can see that group. Fortunately this is not a hard requirement to meet. For example, the SIDs of all default groups that exist both on domain member machines and on domain controllers, are the same. The SID of the local Administrators group and the Administrators group in an Active Directory domain is the same (S-1-5-32-544). The problem emerges when you edit the policy on a machine that can’t browse to the group you want. E.g. if you want to control the membership of the Power Users group on Windows workstations and you are editing the policy from a domain controller (which does not have a Power Users group). If you find yourself in this situation and decide to manually enter the name of the group; that policy will only work on machines where the local Security Accounts Manager (SAM) database contains a group with the exact same name you entered.

If you apply the policy to a machine with a localized version of Windows your policy will fail and the winlogon.log (%windir%\security\logs\winlogon.log) will report error 1332 (0x534) No mapping between account names and security IDs was done. This happens because the groups on that machine have names in the language of the version of Windows it is running. E.g. a German version of Windows XP will not have a local group named Administrators; instead it will be called Administratoren.

To work around this you can edit the policy on a machine that can browse to the group you want. Or you can manually edit the GptTmpl.inf file and add the well-known SID of the group you want. Follow the syntax in the examples above and remember the asterisk. You do not have to enter the members or which other groups that group should be a member of. You can do that in the Restricted Groups interface later. Any members you choose to enter can be either SIDs or group or user names (or computer names). They must be comma separated and groups containing spaces do not require brackets (“).

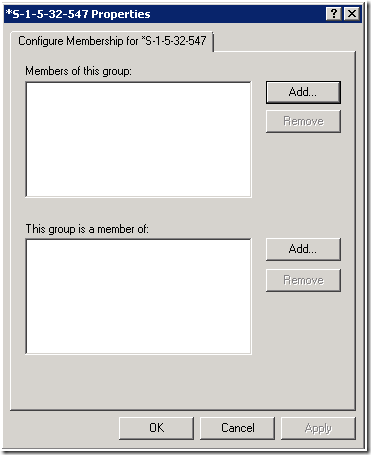
After the well-known SID is present in the policy you can edit it anywhere you like, but note that if that group is not present on the machine you are editing on; only the SID will be displayed. The policy works regardless.
052508_2246_Workingwith3

Figure 5: Editing a group that is not resolvable on the local machine (in this case Power Users on a Domain Controller)

So what about entering the SIDs directly into the Restricted Groups interface? That would be nice so we don’t have to edit the GptTmpl.inf file or get another machine to edit the policy on.

Remember that Windows is built so that whenever you want to enter a raw SID it has to be preceded by an asterisk character (*). Trying to enter that in the restricted Groups interface fails.

052508_2246_Workingwith4

Figure 6: Trying to enter a raw SID in the Restricted Groups interface

So your only option is editing GptTmpl.inf or editing the policy on a machine where you can browse to the group.

Importing

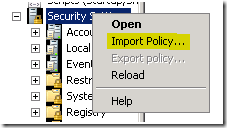
If you already have a nice security template (inf) file ready with the SIDs and membership information you want ready, you can import it directly into a policy. Any settings you have in the template that are already present in the policy will be overwritten.
052508_2246_Workingwith5

Figure 7: Importing a template into a policy

This feature is very handy if you have groups with large membership lists and do not fancy adding them all manually again. Also, every other setting under the Security Settings container can be stored in security templates (inf), so they can be easily moved between servers and domains. Notice also that the Export policy option is grayed out on all domain based GPOs. It is, however, available when editing a local GPO. You can also use the Security Configuration and Analysis snap-in to create a security policy, export it, and then import it into a domain based GPO.

Exchange 2007 Anti-Spam updates and the Automatic Updates client

Exchange 2007 uses the Windows Operating System Automatic Updates Client as a proxy to download it’s anti-spam signatures and reputation lists. The Exchange component responsible for this is the Microsoft Exchange Anti-spam Update service (witht he somewhat confusing description The Microsoft Forefront Security for Exchange Server anti-spam update service.) This service is referred to in the Exchange documentation as the Microsoft Forefront Security for Exchange Server Anti-spam Update service, again, somewhat misleading. The content retreived by the service is data only, no executable binaries are downloaded.
To configure how Exchange gets it’s updates you use the Enable-Antispamupdates cmdlet. This cmdlet has a parameter called -MicrosoftUpdate which can opt the computer in to Microsoft Update and also set the mode of how updates are retreived. The mode set through this cmdlet applies to all content from MU, not just Anti-spam updates and reputation lists. The frequency of the anti-spam updates, however, are set with the -UpdateMode parameter and applies to anti-spam and reputation data only. The -MicrosoftUpdate parameters takes one of the following values:
  • RequestDisabled This value disables Automatic Update.
  • RequestNotifyDownload Automatic Update notifies you when new updates are ready for download.
  • RequestNotifyInstall Automatic Update downloads updates and notifies you when they are available for installation.
  • RequestScheduled This value sets download and installation of updates according to the configuration of the Automatic Update on the computer.

If you run the Get-AntispamUpdates you may see another value, Configured, for the MicrosoftUpdate parameter; like this:

UpdateMode                  : Disabled
LatestContentFilterVersion  : 3.3.4604.600
SpamSignatureUpdatesEnabled : False
LatestSpamSignatureVersion  : 3.3.4604.600
IPReputationUpdatesEnabled  : False
LatestIPReputationVersion   : 3.3.4604.001
MicrosoftUpdate             : Configured

Configred means that the Windows OS Automatic Updates client was already configured for the computer by other means before the Enable-AntispamUpdates cmdlet was run. In other words, when you set the MicrosoftUpdate parameter, you do not configure the Automatic Updates client schedule if you have already configured the Windows Automatic Updates schedule.

Great opening lines

Some books distinguish themselves by having exceptionally good opening lines. Here are some of my favorites:

  • The Gunslinger by Stephen King
    The man in black fled across the desert, and the gunslinger followed.
  • Neuromancer by William Gibson
    The sky above the port was the color of television, tuned to a dead channel.
  • Farenheit 451 by Ray Bradbury
    It was a pleasure to burn.

More to come.