https://gist.github.com/morgansimonsen/8040285
Installing PowerShell with Package Manager on Windows Vista
Package Manager (Pkgmgr.exe) is a new Windows Vista command-line tool that you can use offline to install, remove, or update Windows packages. You can add a package, provided as a .cab file, to an offline Windows image. Package Manager can also enable or disable a Windows feature, either offline or on a running Windows installation. And it is this last piece of functionality that we are going to be using here.
When you install the PowerShell package (KB928439) on Windows Vista it extends the list of optional features that can be selected to enable or disable. A lot of updates behave like this, eg. the Remote Server Administration Tools (RSAT) package. You can run optionalfeatures.exe to use a GUI to enable or disable the available features. But as mentioned you can also use Package Manager (pkgmgr.exe) to enable or disable the same features. The command to enable PowerShell is:
start /w pkgmgr.exe /iu:MicrosoftWindowsPowerShell
To disable PowerShell; run:
start /w pkgmgr.exe /uu:MicrosoftWindowsPowerShell
The start /w part is necessary because the default behaviour of pkgmgr.exe is to return immediately to the command line even when it is still performing its tasks. So to have the command prompt wait for the pkgmgr.exe process to finish before returning, add start /w.
Package Manager requires elevation to run, so either start it from an elevated prompt or be prepared to approve the elevation with the UAC prompt. To check the result of the Package Manager operation run echo %errorlevel% after Package Manager has finished.
To enable or disable other features have a look here for the names:
Windows Vista packages: http://technet.microsoft.com/en-us/library/cc722041.aspx
Windows Server 2008 packages: http://technet.microsoft.com/en-us/library/cc748930.aspx
How to use the whenCreated and whenChanged attributes to search for objects in Active Directory
2008 08 12 00 00 00.0 Z
Setting up Outlook Anywhere with Outlook 2007/Exchange 2007, NTLM authentication and ISA Server 2006
Introduction
There has been a lot of talk in various forums about how to get Outlook Anywhere to work with NTLM authentication through ISA Server 2006. This has also been a high priority for me since single-sign on is a great feature. Users, when logging on from domain joined computers, should not have to enter their network credentials when accessing any service on the corporate network. This post will explain one way of setting up Outlook Anywhere to use single-sign on. I use Outlook 2007 and Exchange 2007 in my set up. Perhaps this is also possible with Exchange 2003 and Outlook 2003, but I have not investigated that. I also make certain assumptions about the readers of this post; I assume you are well versed in both ISA 2006, Exchange 2007 and Window Server terminology and functionality, this is not a detailed step-by-step guide.
The set up
I have 4 machines participating in this set up:
- LAB-DC1: A Windows Server 2003 R2 Domain Controller
- LAB-ISA: A Windows Server 2003 Server running ISA Server 2006 (with the Exchange 2007 publishing patch)
- LAB-EXCH: A Windows Server 2008 (x86) running Exchange 2007 Service Pack 1 (Mailbox, Hub Transport and Client Access Server)
- VISTA01: A Windows Vista with Service Pack 1 client running Outlook 2007 with Service Pack 1.
The three servers are all on the internal network, while the Windows Vista client is on the Internet. The ISA server is publishing Outlook Anywhere.
Fixing the Windows Server 2008/Exchange 2007 SP1 IPv6 bug
The DS proxy component of Exchange 2007 has a bug where it does not listen on the IPv6 addresses of a server. This causes Outlook Anywhere clients not to be able to connect to Domain Controllers and query Active Directory. The clients can successfully connect to the Exchange server using MAPI, but Active Directory access does not work. The way to fix this depends on what Exchange set up you have. If you have the CAS role on a separate server you need to follow these steps (from the MSExchange Team blog):
- Unselect IPv6 from the properties of your NIC (on the RPC-over-HTTP Proxy machine); that will force the RPC-over-HTTP Proxy to use IPv4 to talk to Exchange and everything will be fine. In most cases, this step suffices. If it does not, continue with steps 2 and 3.
- Under the regkey HKLM\SYSTEM\CurrentControlSet\Services\Tcpip6\Parameters, add a 32 bit DWORD with the name Disabled Components and value 0xFF
- Reboot the machine
If you’re in a single-server scenario where the RPCProxy and Mailbox are on the same machine, then the above does not work since the loopback interface still uses IPv6. In this case, you need to make the following changes in the system32\drivers\etc\hosts file:
- Comment out the line “:::1 localhost”
- Add the following two lines:
<IPv4 address> <hostname of the computer>
<IPv4 address> <FQDN of the computer>
A more thorough explanation of this issue can be found here, as well as a good description of how Outlook Anywhere works:
http://msexchangeteam.com/archive/2008/06/20/449053.aspx
http://blog.aaronmarks.com/?p=65
How to set up Outlook Anywhere with Single-Sign On
Exchange 2007
- If you have not already done so; install the RPC Proxy component on the CAS server.
- Enable Outlook Anywhere on the CAS server:
Enable-OutlookAnywhere –DefaultAuthenticationMethod Ntlm –ExternalHostName outlook.lab.com - Install an SSL certificate on the web site hosting Outlook Anywhere.
This certificate must contain the public name where you are hosting Outlook Anywhere, as well as any other names that is required in your setup. - Configure the OAB to use HTTPS:
Set-OabVirtualDirectory –Identity ‘LAB-EXCH\OAB (Default Web Site)’ –RequireSSL $true - Set the external name of the OAB virtual folder:
Set-OabVirtualDirectory –Identity ‘LAB-EXCH\OAB (Default Web Site)’ -ExternalUrl https://outlook.lab.com/OAB -InternalUrl https://lab-exch.lab.net/OAB - Export the SSL certificate and install it on the ISA server.
ISA Server 2006
Create a standard publishing rule for Exchange2007 Outlook Anywhere; select to publish additional folders for Outlook 2007 clients:

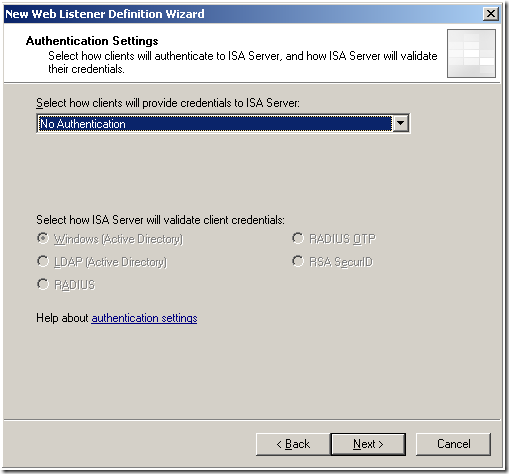
- During the creation of the publishing rule; create a new listener for Outlook Anywhere, on the Authentication page, select No Authentication:
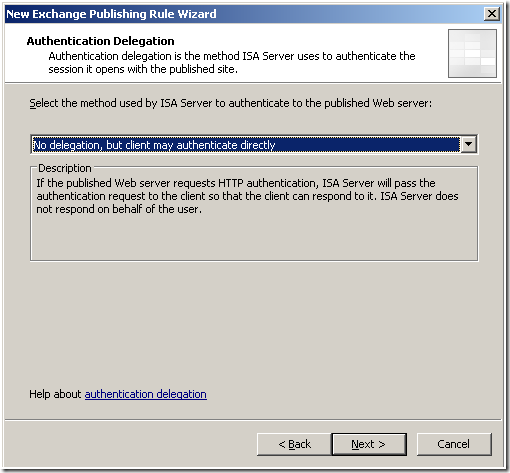
- Back in the rule wizard, select the No delegation, but client may authenticate directly option:
Client/Outlook 2007
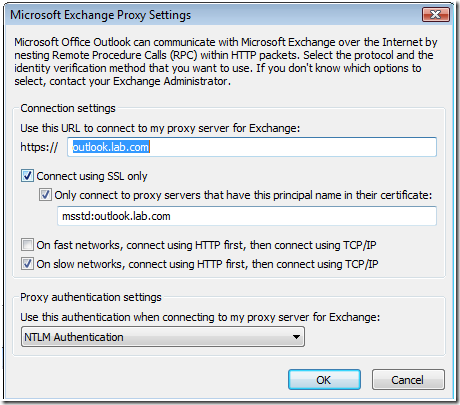
- Start Outlook 2007 on the client, while it is connected to the internal network. This will cause Outlook to contact the Autodiscover service and automatically configure itself for regular MAPI/RPC operations as well as Outlook Anywhere (HTTP):
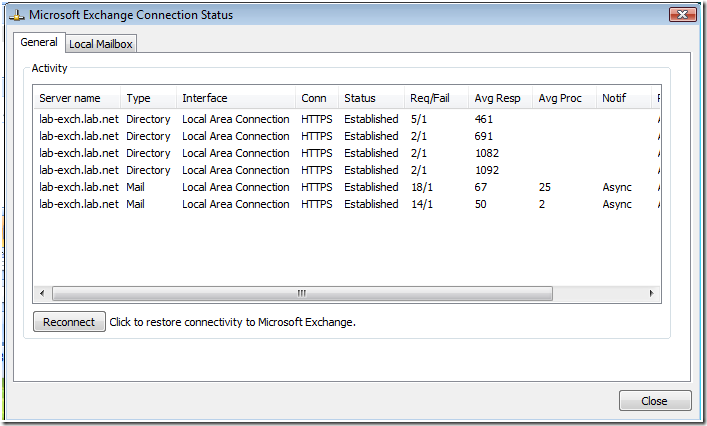
- Disconnect the client from the internal network and connect it to the Internet. Open Outlook:

Outlook will connect to Exchange without requiring a username or password. The Connection Status box will show a successful connection:
- Run the Test E-mail AutoConfiguration tool:
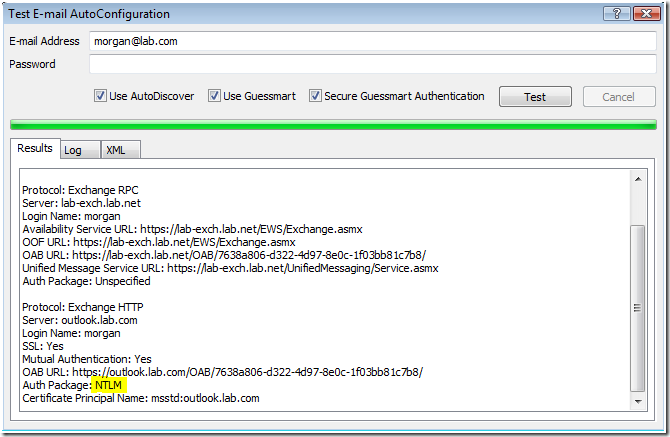
As you can see the Autodiscover service was successfully contacted. The AS service is also set to accept NTLM by default.
How it works/notes on security
This setup allows the client to directly authenticate to the Exchange 2007 CAS server, reducing the ISA Server computer to a mere reverse proxy, only performing HTTP inspection, you lose the benefit of ISA pre-authentication. This should not be a major problem, but should be evaluated carefully before implementing in your network.
Unexpected password prompts
If the Outlook client is left untouched for extended periods of time, typically over 1 hour, the connection to the Exchange server is somehow severed, and Outlook will prompt the user for their username and password. You will not be able to reconnect even if you enter the correct username and password. I think this is because ISA server terminates the connection between the Exchange server and Outlook if it is left unused for a long time. The way to recover from this situation is by either restarting the IIS services on the Exchange server or the Firewall service on ISA server. Further investigation is needed to determine the exact cause of this problem.
Conclusion
This has been a quick guide to achieving single-sign on for Outlook Anywhere with Exchange 2007 and Outlook 2007. With this setup you lose ISA pre-authentication. There may be another way to achieve the same result using Kerberos Constrained Delegation (KCD), that will be the topic of a future post.
Upgrading from Windows Server 2008 Standard Edition to Windows Server 2008 Enterprise Edition
I recently was given a couple of Windows Server 2008 Enterprise Edition special Not For Resale evaluation packs. These were given out at the Heroes Happen Here event here in Norway. Since my main Windows Server 2008 machine, running Standard Edition, was unlicensed at the moment I thought I would upgrade it to the NFR Enterprise edition.
I popped in the DVD and selected Upgrade from the install wizard. The process started and took about 45-60 minutes. Everything seemed to work after the upgrade. The screen resolution was reset to the default 800×600 and I had to reinstall the NIC driver, but apart from that everything seemed fine. After a little while I noticed that the server was acting sluggish and soon discovered that the MS Exchange System Attendant service (mad.exe) was consuming 100 % CPU continuously. In addition to being my Domain Controller the server was also running Exchange 2007, and apparently Exchange did not like that the underlying OS had been upgraded. I had half-way expected this and went into the Exchange install folder to run setup again in maintenance mode (setup.com /mode:recoverserver). Ufortunately, setup did not give me an option to recover the server, it just told me to select a new role to install. I then tried to use setup.com /mode:upgrade and now the server went through a reinstall. After the System Attendant was working normally and there were no issues. I also reinstall the latest rollup for Exchange.
So now I have a licensed Windows Server 2008 Enterprise edition server. The NFR pack says it is a special one year evaluation version, but slmgr.vbs does not report an expiration date. Hopefully it will last indefinitely.
How to manually transfer a user profile from one user to another
Introduction
A computer’s affiliation can change in many ways:
- From workgroup to domain.
- From domain to workgroup.
- From one domain to another domain.
Common to these scenarios is that the user or users using the computer loose access to their locally stored user profiles. When a computer joins a domain it usually means the persons using the computer are given domain accounts to use to log on. The local profiles stored on disk are not associated with these new domain accounts and, even though it is the same person using the computer, he or she loose access to the profile and thus all their settings.
The same is true when the computer leaves the domain. Domain based account can no longer be used to log on to the computer and the persons who use the computer must start logging on with local user accounts. Again the profiles associated with domain based users are not available to the new local user accounts.
Likewise when a computer leaves one domain and joins another, the persons using it are given new accounts in the new domain and these accounts cannot access the profiles of the accounts from the old domain.
Needless to say, this is a big problem for the end-users. The profile stores a lot of settings and reconfiguring all of these is, at best, boring. So how can we mitigate this problem for our users?
HKEY_USERS, HKEY_CURRENT_USER and NTUSER.DAT
The registry consist of several, so called, hives; HKEY_LOCAL_MACHINE, HKEY_CURRENT_USER etc. To fix the profile problem of our users we need to learn about the HKEY_USERS and HKEY_CURRENT_USER hives.
HKEY_USERS
The HKEY_USERS subtree contains all actively loaded user profiles. HKEY_USERS has at least three keys:
- .DEFAULT, which stores the profile used when no users are logged on to the computer (such as when the CTRL+ALT+DELETE logon prompt is displayed).
- A subkey named for the Security Identifier (SID) of the current local user. This subkey contains the current user’s profile. If the user is logged on remotely, the data for the user’s profile is stored in the registry of the user’s local computer. The data in HKEY_USERS\SID also appears in HKEY_CURRENT_USER.
- A subkey named for the Security Identifier (SID) of the current local user with the _Classes suffix. This subkey contains the current user’s Classes. The data in HKEY_USERS\SID_Classes is also contained in HKEY_CLASSES_ROOT.
Figure 1 HKEY_USERS
In the picture above there are 5 loaded user profiles:
- .DEFAULT
- S-1-5-18 (NT AUTHORITY\SYSTEM) which is Local System.
- S-1-5-19 (NT AUTHORITY\LOCAL SERVICE) which is Local Service.
- S-1-5-20 (NT AUTHORITY\NETWORK SERVICE) which is Network Service.
- S-1-5-21-1777867841-237173671-2295844794-1001 which is a local user account (called OldUser in this case).
If another user were to log on the computer, either through Fast User Switching or if the current user launches a program as another user, a new SID will appear under HKEY_USERS representing the registry hive of the new user. When a user logs off his or her hive is unloaded from HKEY_USERS.
HKEY_CURRENT_USER
The HKEY_CURRENT_USER subtree contains the user profile for the user who is currently logged on to the computer. The user profile includes environment variables, personal program groups, desktop settings, network connections, printers, and application preferences.
The HKEY_CURRENT USER subtree does not contain any data. It just stores a pointer to the content of the HKEY_USERS\ Security ID (SID) of the current user subkey. Therefore, the content of that subkey also appear in HKEY_CURRENT_USER, and it can be viewed and changed in either location. This subtree provides easier access to the data.
A new HKEY_CURRENT_USER subtree is created each time a user logs on. The data for the subtree comes from the profile of the current user. If no profile is available, the subtree is built from the user profile settings established for a default user, which are stored in %Systemdrive%\Documents and Settings\Default User\Ntuser.dat (Windows <5.1) or in %systemdrive%\Users\Default\ntuser.dat (Windows 6.0<).
Figure 2 HKEY_CURRENT_USER
NTUSER.DAT
Each user’s registry hive is stored in the user profile in the NTUSER.DAT file. When a user is logged on the contents of NTUSER.DAT in that user’s profile directory is loaded into HKEY_USERS and also mapped into HKEY_CURRENT_USER. Inside a session the HKEY_CURRENT_USER always maps to the registry of the user who is logged on to that sessions. If a user starts a program as another user, the session created for that program, which has the other user’s security token, will see its own registry settings in HKEY_CURRENT_USER.
Profiles and permissions
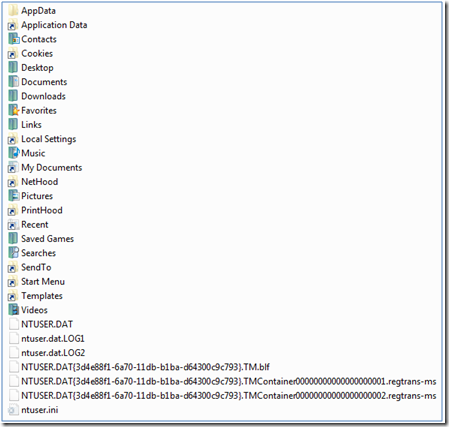
As we have established the registry hive of a user is located in the users profile directory, and stored in NTUSER.DAT. But a profile contains much more than just a registry hive. It also consist of several directories containing everything from mail items to favorites.
Figure 3 A typical user profile on Windows Vista
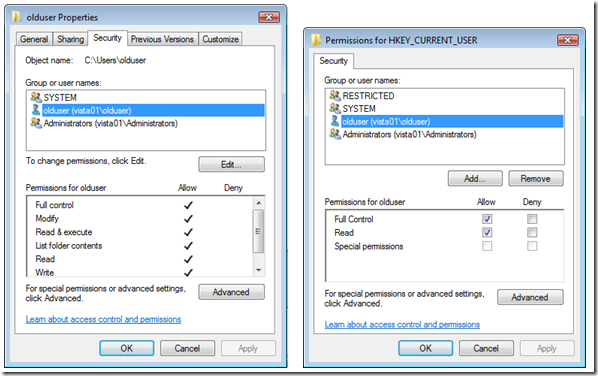
The user owning the profile is given full control access to it when it is created, both in the hive in NTUSER.DAT and in the file system.
Figure 4 NTFS Permissions and registry permissions in a user profile
The HKEY_LOCAL_MACHINE hive contains a section for mapping user SIDs (and GUIDs) to the correct file system folder containing the profile. The path to the key is HKEY_LOCAL_MACHINE\SOFTWARE\Microsoft\Windows NT\CurrentVersion\ProfileList.
Figure 5 The ProfileList key
The ProfileList key contains a listing of every SID that has ever logged on to a computer and under the SID key the ProfileImagePath value points to where the profile for that user is located in the file system.
Note also the Sid value which contains a hex representation of the SID of the user owning the profile.
Domain joined computers also have a ProfileGuid key at the same level as the ProfileList key. The ProfileGuid key contains GUID to SID mappings for profiles.
Transferring the profile
From what we learned about the ProfileList key, transferring a profile to another user should be as easy as changing the ProfileImagePath value for the new user to point to the profile directory of the old user. Unfortunately, this will not work, even if the user receiving the profile is member of the local Administrators group. We have to change both the registry and NTFS file permissions to make the new user use the old profile. Here is what you do:
- Log on as the new user.
This created a profile directory and entries under the ProfileList key pointing to this new profile directory. - Log on as a user who is a member of the local Administrators groups. This cannot be either the user who’s profile we are transferring or the user who is to receive that profile.
- Change the NTFS permissions of the profile, giving the new user Full Control permissions on all files and subfolder. This is most easily done with an elevated command prompt and icacls.exe (or your permissions editor of choice).
icacls.exe c:\Users\olduser /grant VISTA01\newuser:F /T /C /Q - Load the NTUSER.DAT hive from the old user’s profile directory under the HKEY_USERS hive. Either use the GUI or this command:
reg load HKU\test c:\users\olduser\ntuser.dat - Grant the user receiving the profile Full Control to the entire hive. GUI or command:
subinacl /noverbose /subkeyreg HKEY_USERS\test /grant=vista01\olduser=F
(Note: There is a problem with SubinACL.exe that makes it not apply inheritance correctly. The above command circumvents this by adding the ACE to all keys.) - Unload the hive. Either through the GUI or with this command:
reg unload HKU\test - Update the ProfileImagePath value under the new user’s SID in the ProfileList key, to point to the folder of the old user’s profile.
- Log on as the new user.
- When you are satisfied that the profile is working as expected you can delete the profile directory of the new user (which has only been used once), and rename the old profile directory to the username of the new user. Remember to again update the ProfileImagePath value if you do this.
Another way
Windows also has a more user friendly way to transfer a user profile from one user to another. That way is accessed through the System Properties window.
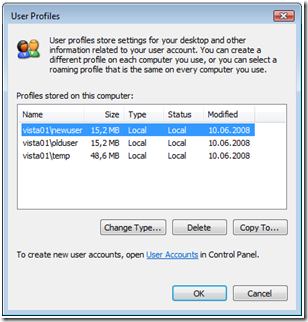
The Settings button reveals a list of all the profiles stored on the computer:
Here we can use the Copy To… button to copy a profile from one user to another.
We also need to change who is permitted to use the profile, using the Change button at the bottom of the dialogue.
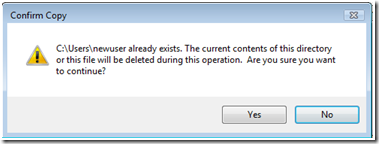
If the folder we are copying the profile to already exists, we receive a warning:
After the process is finished you can log on as the new user with the old profile.
This method does all the changes that the first method does, except changing anything under the ProfileList keys. In this case we are copying the old profile into the new user’s profile folder and there is thus no need to change anything in the Registry. Except from that it does what I showed before; change the file permissions and the registry permissions inside NTUSER.DAT.
Note that this method also requires that you on as the new user at least once to create the profile directory and the keys under ProfileList in the registry.
Which method you prefer is entirely up to you, but I’ll go with no 1.
What do you lose?
These are the items in the old profile that you lose access to from the new user:
-
Data that is protected by the Data Protection API (DPAPI)
DPAPI helps protect the following items:- Web page credentials (for example, passwords)
- File share credentials
- Private keys associated with EFS, S/MIME, and other certificates
- Program data that is protected by using the CryptProtectData() function
More information
- How to copy data from a corrupted user profile to a new profile in Windows XP
http://support.microsoft.com/kb/811151
Installing printer drivers from a Windows Vista installation
Windows Vista comes with a huge collection of printer drivers in the box. If you need to install one or more of these drivers on a print server go to the Sharing tab of you printer and hit the Additional Drivers:
Check the driver you want to install and hit OK. Windows will ask you where the driver is located. Now browse to the following folder on the Vista machine:
C:WindowsSystem32DriverStoreFileRepository
This is where Vista keeps its driver store. For printers, the folders you are looking for start with prn. HP printer drivers are stored in the prnhp###.inf_######## folders for example. The tricky part is to determine which folder holds your required driver. Windows will not do a recursive search through the folder hierarchy so you have to point it at the correct folder for your printer. I usually do a search in the file contents for the name of the printer I am installing a driver for.
You can (of course) use PowerShell to do the searching for you. One of many possible commands is:
get-childitem -Path C:WindowsSystem32DriverStoreFileRepository -include *.inf -recurse | select-string -pattern ‘hp deskjet 980’
This will echo out the name of the file that contains the text hp deskjet 980, as well as the line in the file that contains the text.
Note: If you do this, you will notice that you get two folders containing inf files that match the text you searched for, provided that you searched for the name of a printer whose driver comes with Windows. Doing a compare of these files yields very few differences, and it seems to me they are for the same driver. You can compare two files like this:
fc.exe /U C:WindowsSystem32DriverStoreFileRepositoryprnhp001.inf
_65b34c6aprnhp001.inf C:WindowsSystem32DriverStoreFileRepositoryprnhp001.inf_884be055prnhp001.Inf
If you require x64 drivers you need to connect to a Vista x64 computer and if you need an x86 driver you connect to Vista x86.
Microsoft Office Live Meeting 2007 error
Note: You can still upload PowerPoint presentations.
CDocConverter::GetMODIPrinterName, Line 195, Err = Failed to find MODI printer name!
ModiInstaller::AddPrinterDriverW, Line 387, Err = CopyFile failed! Src=C:Program Files (x86)Microsoft OfficeLive Meeting 8Consolelmdigraph8.dll Dest=C:Windowssystem32spoolDRIVERSx64lmdigraph8.dll, GetLastError=5
ModiInstaller::InstallPrintDriver, Line 199, Err = AddPrinterDriver failed!
ReinstallNBPrinter, Line 758, Err = Install of print driver failed!
PrintToModi::Convert, Line 307, Err = Print driver could not be installed!
IsNBPrinter, Line 599, Err = PrinterDevMode failed to initialize!
FindNBPrinter, Line 667, Err = Error = 80004005
FindNBPrinter, Line 685, Err = Error = 80004005
FindNBPrinterName, Line 705, Err = Error = 80004005
CDocConverter::GetMODIPrinterName, Line 195, Err = Failed to find MODI printer name!
PrinterDevMode::Initialize, Line 187, Err = DocumentProperties size request failed! Error = 0
IsNBPrinter, Line 599, Err = PrinterDevMode failed to initialize!
FindNBPrinter, Line 667, Err = Error = 80004005
FindNBPrinter, Line 685, Err = Error = 80004005
ModiInstaller::AddPrinterDriverW, Line 413, Err = GetLastError() = 216
ModiInstaller::InstallPrintDriver, Line 199, Err = AddPrinterDriver failed!
ReinstallNBPrinter, Line 758, Err = Install of print driver failed!
PrintToModi::Convert, Line 307, Err = Print driver could not be installed!
Availability of the Active Directory GUID converter
Availability of the Group Policy Hide drives calculator and associated template
- CustomDrives.adm: The template that lets you enter the numeric values directly.
- HideDrivesSelector.hta: The HTML based application to calculate the numeric values, as well as doing a “reverse” lookup of existing values.
When I have the time I plan to update the custom template to the new ADMX/ADML format for Windows Server 2008, but I do not think that will be anytime soon (Tempus fugit).


